by Michael Benolkin, Cybermodeler.com
When it comes to the fundamentals of scale modelling, you really only need three things: a kit, a hobby knife, and glue. Even the hobby knife is optional, though you run the risk of damaging the model without a way of cleanly separating each part from the sprue. As we get more sophisticated and experienced in our modelling, we broaden our essential tools to include paint brushes, airbrushes, and paints of all sorts. Somewhere along the line, we also gained access to a wide range of adhesives to replace our glue. Most modellers have their favorite glue to build their models, though the wiser modellers will have several in their reach – the right tool for the job. In this discussion, we’ll cover the more popular adhesives: liquid cements, cyanoacrylate, white glue, and watch crystal cement.
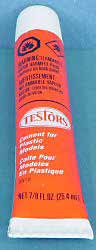 Like most of you, I started modelling many moons ago using good old-fashioned tube glue, which some models still include in their packages. Today, tube glue has been re-engineered not to have the overwhelming odor that would get you high (“I picked a bad year to stop sniffing glue!” – Lloyd Bridges from the movie ‘Airplane’). It is ideal for young modellers who are just learning how to assemble models
and need the extra time to get things placed correctly before the glue cures.
I used to jump around between different hobby glues as I’d hear different modellers swear by the results of their latest discovery. I remember when Tenax first hit the streets. This stuff was nearly instantaneous for bonding two styrene surfaces together, but it is as volatile as methyl ethyl ketone (MEK) – you could open a bottle of Tenax and literally watch the fluid level drop as it evaporates. Just don’t breathe while trying this experiment as the vapors are harmful.
I also remember when Crazy Glue came on the scene – cyanoacrylate. Instantaneous adhesion. It didn’t take long before we started seeing different types of cyano, thin, thick, slow, and a Zip Kicker to accelerate the thicker applications. So which is the right one to use? Let’s take a look:
Liquid Cements
Despite all of the ‘specialty’ glues on the market, I prefer simple liquid cement for assembling fuselage halves, wing halves, tank suspensions, etc. Why? Liquid cement has the strongest bond after it is dry.
I’ve used cyano, for example, to assemble fuselage halves and while the results are near-instantaneous and rock solid, the bond is brittle and intolerant to flexing. There is nothing more disheartening than to be in the final stages of decaling your model only to hear a small ‘snap’ as a section of cyano gives up its bond from all of the handling. Liquid cement is slower to cure, but it is the strongest bond for joints like those mentioned above.
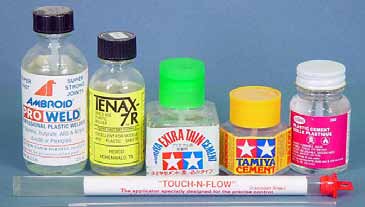
Like most of these adhesives, liquid cement will mar the surface of your model if it runs off of the intended target. One of the best tools on the market for applying liquid cement is Touch-NFlow. I keep several on-hand because invariably one will become blocked with a bit of styrene in the tip and it will need to sit in cement for a while to dissolve and clear the blockage.
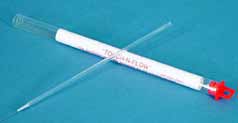
You can read more about the Touch-N-Flow applicator here: https://www.cybermodeler.com/hobby/tools/flexi/tool_flexi_tif.shtml
There are a variety of liquid cements on the market. The ones I use are:
Testors Liquid Cement – this has been on the market forever and is still as reliable as ever. Unlike its competitors, the Testors formula has vapors that are harmful and shouldn’t be left open.
Tamiya Thin Liquid Cement – Tamiya has just entered the glue game with two types – a thin and a thick. From what I can tell, the thin is thinner than Testors which is useful for applying to fuselage joints as the thinner viscosity means that it will run further into the seams. One other major advantage of the Tamiya liquid cements over the Testors brand is odor. Tamiya has formulated their cements where they don’t smell bad nor seem to have toxic effects. Testors liquid cement will give you an unpleasant buzz or nausea from prolonged exposure to the vapors if you make the mistake of working in an unventilated area.
Tamiya Thick Liquid Cement – The thicker Tamiya cement appears to be thicker than Testors, and it has been useful for applying to the tabs on horizontal stabs where you need to join the two together simultaneously through the fuselage. The thin and Testors cements would have evaporated/cured before you could get everything together whilst the thick cement cures slower.
Tenax 7R, Ambroid Pro-Weld, Plastruct Plastic Weld
These adhesives are the thinnest and ‘hottest’ of the liquid cements, but they are best used in spot applications like antennas and non-load-bearing joins where you’re looking for near-instantaneous adhesion. These products must be used with care as they will attack plastic the worst in this category, and will evaporate rather quickly if the bottle is left open. I keep one or more of these products around for applications where the other liquid cements aren’t responding. These are usually my ‘Plan B’ products.
Cyanoacrylate
 It all started with Crazy Glue, but over time, this quick-bonding medium has been morphed into specialist categories and some are better than others. As I mentioned above, I don’t use cyano products to bond major components like fuselage haves together as cyano becomes brittle and intolerant to flexing. Worse yet, cyano places a layer of adhesive between the parts. If you later decide to use cement, you must clear the parts of the cyano residue in order for the cement to have contact with the styrene. If we’re talking about a fuselage, we’re talking about taking the fuselage apart to clean the bonding surfaces – not good!
Where cyano is at its best is joining non-styrene parts together, and bonding them to styrene. If you’re into multimedia kits, cyano is one of the best ways to assembly resin parts together, then bonding the resin subassemblies to the styrene parts.
One of the worst uses of cyano is for installing styrene
canopies. The curing vapours will permanently craze your clear parts. In fact, if you’re using cyano to install parts near previously installed clear parts, you’re still in danger of crazing the clear parts.
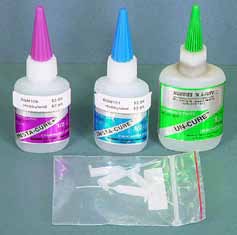
Cyano comes in two essential flavours – thick and thin. The thin is okay for installing small parts, but it cures almost instantaneously, so you must be quick. I use the thin applicator tips that are available separately
to apply the thin cyano straight from the bottle to a very precise point. Be careful… if you squeeze
too hard, you’ll still get lots of cyano everywhere.
Thick cyano is excellent for two reasons – it cures
slower and it gap-fills. This allows you a few seconds to position a part before the cyano hardens. Once I’ve bonded a fuselage together with liquid cement, if I see a seam line remaining because the kit wasn’t molded properly, I’ll run a bead of thick cyano along the seam, a section at a time, then sand it smooth.
Even if this filler becomes brittle, it isn’t holding the fuselage together, so it is ideal in this situation.
On a sidebar, I’ve watched the radio control modellers build an entire six-foot wing in minutes using
thick cyano. They use ‘Zip Kicker’ to instantly cure the cyano so they can place a rib, cyano the part into place, make any fine adjustments, then Zip the part. The results are fast and impressive, but the workshop stinks to high heaven because the cyano reaction to the Zip accelerator releases a ‘unique’ smell.
I’ve used Zip Kicker on my modelling as well with good results, but I offer the following considerations:
Using Zip on cyano creates a harder surface on the cyano, making sanding more of a chore. If you wetsand within say 15 minutes of Zipping the cyano, you’ll be okay, but once it really hardens, it will be
like sanding titanium.
The Zip compound will ever-so-slightly soften the styrene surface. If you touch a wet spot, you’ll leave
an impression in your styrene surface. Once the Zip has dried away, the styrene is safe to touch again.
Zip can craze softer styrene, use a little on an empty sprue tree from the kit in question if there is any
doubt. Zip also leaves a residue on the surface of your model that you MUST wash away or it can interfere with your paint.
One last tip on cyano adhesives – buy the smallest containers. When you go to the hobby shop,
you’ll see that cyano products come in different sizes and you might think that you’re saving money by
purchasing the larger bottles. You’re not. Once you open the bottle, the cyano has a limited shelf life – it
will gradually start to harden over time. A bottle, no matter the size, will remain viable for a month or two once opened, and once the fluid starts to thicken, it is difficult to work with, you’ll end up tossing out the remaining cyano. If you’re going through the equivalent of 2-3 small bottles a month, by all means purchase the larger quantities. If you’re just using it for the occasional gap-fill or resin/photo-etch assembly, stick with the small bottles. Any of the bottles will last indefinitely until you open them the first time, so when in doubt, stick to the small bottles. You’ll save money in the long run.
White Glue
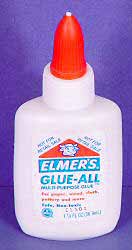 White glue? Elmer’s White Glue, you bet! White glue isn’t effective for bonding parts to styrene that will be subjected to handling stresses, but it is absolutely ideal for installing canopies and gap-filling between
the fuselage and window parts. White glue is water soluble, so don’t use this until you’ve already
washed your model for painting (or after painting). If you apply white glue with a tooth
pick, you can control where it goes very nicely. If you get too much somewhere, you can try to remove it while it is still wet, but I let it dry and then lightly rub the affected area with a damp Q-Tip to remove any excess.
If you’ve seen some of these products that you can use for windows on smaller openings like the passenger windows on airliners or portholes on ships, these are essentially the same as white glue. Stick a small blob on the end of a toothpick into the window hole, touch all edges with the toothpick, then remove the toothpick. What you should have left is a white blockage where the hole was. When it dries, the window will be clear.
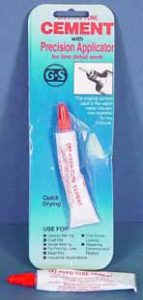
Watch Crystal Cement
 Do you ever wonder why your watch crystal doesn’t simply pop off with all of the abuse you subject it to?
Watch Crystal Cement. The model railroaders figured out that this stuff is tough – tougher and more flexible than cyano. The cement comes in a tube and is thicker than tube model cement. It takes a while to cure, but it dries very strong and perfectly clear. I’ve used it to install windscreens and windows
that may be subject to some handling and the bond has been bulletproof. You can find this stuff at your better hobby stores or at Micro-Mark.
Safety Considerations
With the exception of white glue, all of these products must be used in a well-ventilated area so that you won’t dry-clean your lungs. The vapors from the MEK-like Tenax 7R, Ambroid Pro-Weld, and Plastruct Plastic Weld products are especially harmful. Cyano-based products will glue just about anything to anything. If you spill a little on your fingers – DON’T TOUCH ANYTHING!!! Let it dry and use one of the uncuring products to dissolve the cyano when its safe. When these products first came on the market, people were accidentally gluing their fingers together or worse, gluing their hands to some other part of their body, someone else’s body, or some inanimate object within reach. This resulted in numerous war stories from several modellers who work as paramedics on how some of our fellow modellers discovered new and innovative ways to get in trouble with cyano products. For example, don’t spill cyano on your fingers and then try to pet the cat…
Conclusions
I’ve given you a whirlwind look at the various glues and cements that I use in my own modelling. I’m
sure there are other options out there, so consider this a starting point to do your own research and to
apply your own experiences with different types of products. The bottom line here is that there is no one
product that does it all. Each one has its strengths and weaknesses, and most of us learn the weaknesses
as we apply these products to new situations. Use them all safely – take your time.

